Viewing entries in
cakes

Pumpkin "Spice" Cheesecake

Comment

Pumpkin "Spice" Cheesecake

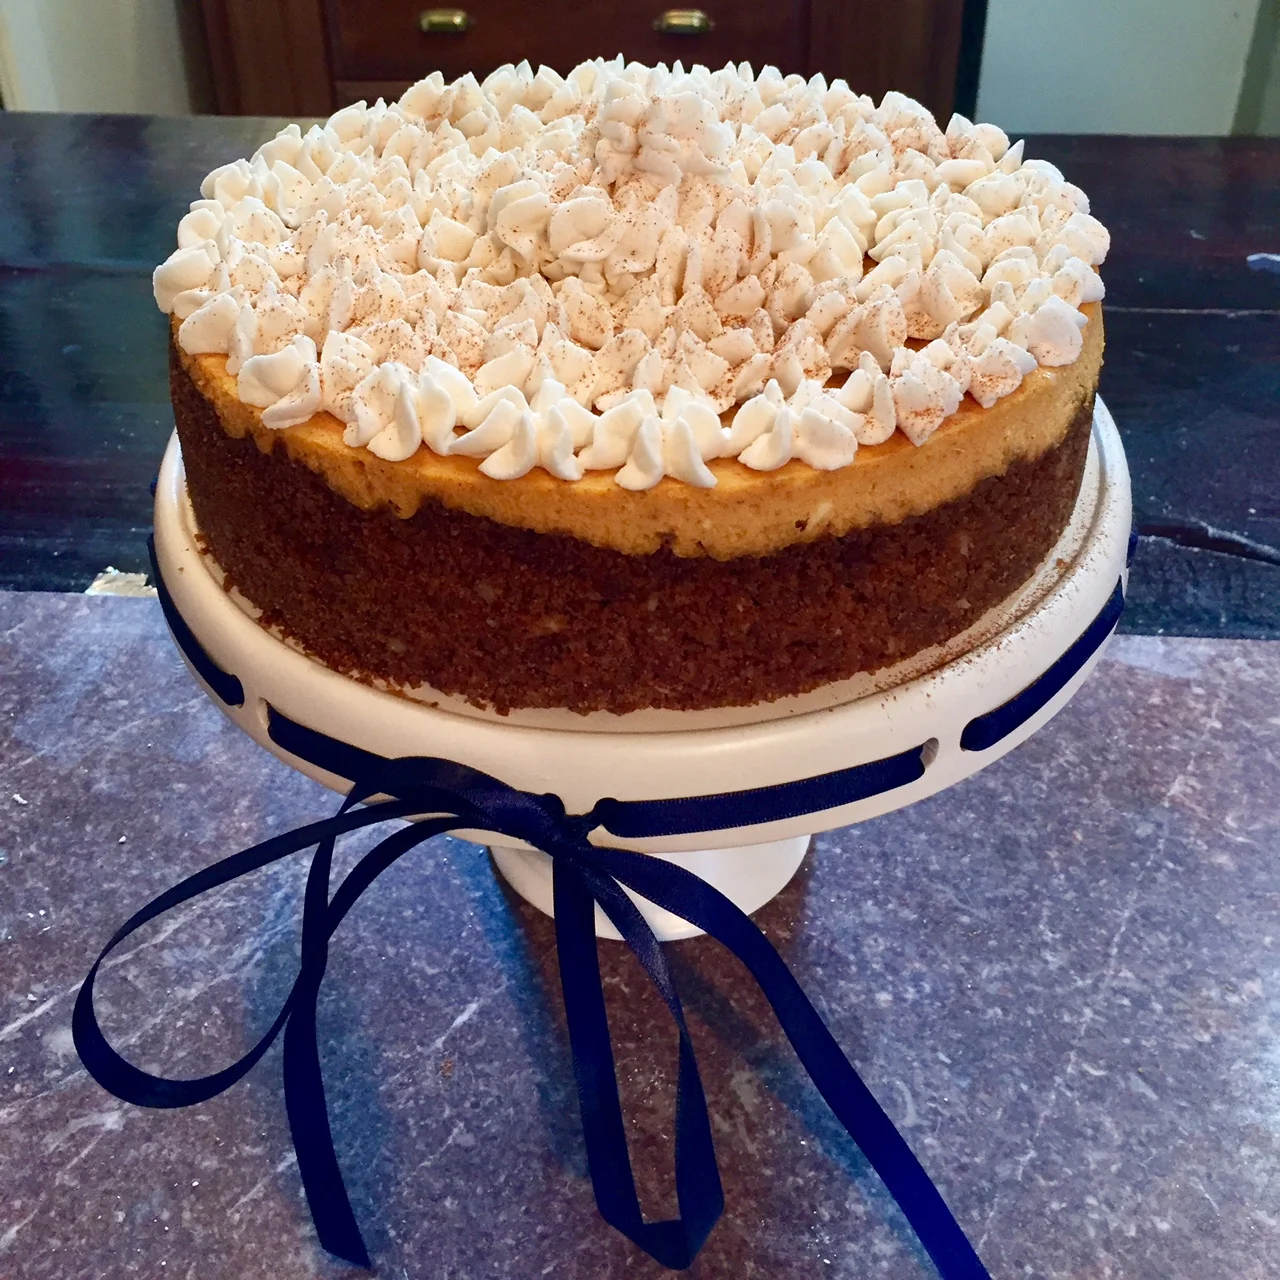
Though the title makes me sound like a valley girl, I’m FAR from it, basically.  I have NEVER liked pumpkin pie.  I tried a twist on the flavors a few years back, and once I made this cheesecake, it became the requested dessert that I bring to holiday gatherings!! Recently, I’ve revamped the topping and crust a little bit to make a beautiful Pumpkin “Spice” Cheesecake!

Ingredients:
CRUST:
12 oz. GENERIC gingersnap cookies
2 T brown sugar, packed
6 T salted butter, melted
1/2 C chopped nuts (hazelnuts or pecans)
Pinch of Kosher Salt

FILLING:  
3 (8 oz.) packages of Cream Cheese, room temp
15 oz. can of pure pumpkin puree (if watery, drained.)
3 Large Eggs, plus 1 yolk
¼ C of Sour Cream, room temp
1 ½ C of granulated sugar
½ t cinnamon
¼ t fresh ground nutmeg
¼ t allspice
1/8 t cumin (this is my secret ingredient that gives a little “smokiness” to the flavor.)
2 T All-purpose flour
1 t pure vanilla extract

Other stuff that you’ll need:
Food Processor OR rolling pin
9 inch Spring Form Pan
11inch cake plate OR Aluminum Foil
Large enough pan to hold water and 11 inch cake plate
Stand/hand mixer
Piping Bag
Standard star tip

Instructions:
Bring all of your refrigerated ingredients to room temp. Preheat the oven to 350°F.

Make sure that the spring form pan is fitted with the bottom bevel upward; Prepare the Spring Form Pan with doubled Aluminum foil wrap to cover the outside making it watertight. If using a 11 inch cake plate, no need to do this part ☺.

For Crust:
In a food processor, grind the gingersnaps into a fine meal. It will take SEVERAL pulses (35 for me). The generic ginger snaps aren’t as hard and will pulverize MUCH easier.
Mix together with brown sugar, salt and add melted butter. Press into the bottom and up the sides of the spring form pan and par bake in your preheated oven for 10-12 minutes. Other school of thought is to chill in the fridge for 30 minutes.  

For Filling:
A key to the filling is to make sure that not too much air gets in to avoid cracks. Beat the cream cheese and granulated sugar until smooth on a low speed. Add pumpkin puree (NOTE: when can is inverted, the pumpkin puree should not come out, if it does, drain excess water out of can before adding to mixture), eggs, egg yolk, sour cream, and spices. Add Flour and vanilla. Beat together until well combined on a low speed.  Pour into chilled/parbaked crust. If using, place pan into 11 inch cake pan. If watertight with aluminum foil, go ahead and place into water bath in oven for 1 hour. DO NOT open the oven! I mean, you can, but it may crack your cheesecake. Ovens vary, SO, when 50 minutes has passed, check the cake to see if there is about a 3-4 inch circle in the center that is a little jiggly and the sides are puffed up.^^^^ Turn the oven off and crack the door for about an hour to let the cake start cool. Then, remove and cover with plastic wrap and chill for at least 4 hours or overnight. This is the hardest part about cheesecake: you can’t eat it right away ☹.

After the cheesecake has chilled, it’s time to unmold. If you used aluminum foil, remove it, release the clasp on the spring form ring and remove. With a butter knife, loosen up the crust from the bottom and slide the cake onto your serving platter.

This will need to be refrigerated and will stay for about 4 days.

^^^^After testing this recipe a few more times, the water bath slows the cooking process slightly, it could take up to 1 hr 20 minutes to get the result of the "set" in the cheesecake. Also, I found better results after turning oven off, when I left the door closed for 15 minutes and then cracked for 45. Either way, it's DELICIOUS! 

Comment

Apple Stack Cake Cake Cake!!

1 Comment

Apple Stack Cake Cake Cake!!

These cakes are by far the fondest memory from my childhood/early adulthood. I remember stacks and stacks of these cake layers sitting around the kitchen when my mom and grandmother were baking and preparing them. The best part about this process is that they were giving them as gifts; after my grandmother had passed, my mom and I continued this tradition through college, and I gave them as gifts to my college professors! AND they are better the longer they sit.  Making ahead during a busy holiday season, makes this cake so sweet :D!!

Ingredients:
Filling between layers:
1 46 oz jar of applesauce
2 t cinnamon*
2 t allspice*
1 ½ C of sugar*

4 tart apples (granny smith/golden delicious), pealed, halved, cored, cut in about ¼ inch thick from top to bottom
½ C of water
2 T brown sugar
1 t cinnamon*
1 t allspice*
½ t ground nutmeg*
*Amounts will vary to taste preferences
 
Cake Layers:
3 C Self-rising flour (if you only have All-purpose, add 1 ½ t baking powder and ½ t salt per cup of flour)
1 ½ C sugar
1 C Vegetable shortening
3 large eggs, room temp
1 t pure vanilla extract
1 t cinnamon
1 t lemon extract (optional)

Instructions (this is the order that best worked for my process; you can totally do it in another order):

Applesauce filling (if you're not using store-bought apple butter):

In the large stockpot, empty the entire apple sauce jar stir and put over medium low heat to cook out the water. You’ll need to stir about every 15 minutes or so, this is the LONGEST active part of the process. It’ll take about 2-2 1/2 hours to get it to the right consistency (if you’re crunched for time, you can use store bought apple butter . . . )Put it on the back burner while you prep your cake dough. After all of the water is cooked out (if the entire mixture is pulled to the side of the pot, it will stay “put” without spreading over the bottom), mix in sugar and spices and simmer for about 15 minutes (taste to make sure it has enough sugar for your taste buds); remove from heat and cool. This cooks to about ½ the original jar. This mixture will have some left over that you can put back into the applesauce jar to put on biscuits/toast as apple butter J. It’ll store for about a week in the fridge.

 Cake dough:

In a large bowl, sift and whisk together flour (components for self-rising if needed), sugar and cinnamon. Measure out the shortening and with a knife, while turning the bowl, cut in the shortening to the flour mixture. The mixture will look like small pebbles when the shortening is combined adequately. Make a well in the center and add all of the wet ingredients: eggs, vanilla and lemon. Use a wooden spoon to get the mixture almost together and then using your hands, finish bringing the mixture into a big ball. Weigh and depending on your amount, divide into 4 even size balls. Place balls back into mixing bowl, cover with plastic wrap and chill for about 2 hours to overnight. (We used to make batches at night and then cook the next day to prevent a LONG day making 5 or 6 batches at a time).

After about 1 ½ hours, turn your oven to 350°F. Prep your pans with cooking spray and take each ball putting them in the center and with your fingers push the dough around the outside, around the outside, around the outside in an even layer on the bottom of the cake pan. This is the FUN part! Bake for about 12-15 minutes (dark pans cook faster). When the cake is brown and is starting to pull from the sides of the cake pan, she’s done! Let set in pan for about 10 minutes in the pan and then invert to remove and completely cool. They will be a little pliable, so be gentle not to snap them in half . . . If one breaks, put it on the bottom of the cake J!

 Apple Slice Layer:

Peel and slice apples in half. Cut out core from either side. Lay apple flat side down and cut from top to bottom into ¼ inch slices. Put into slices into a heavy bottomed pot with ½ cup of water and spices and cook, mixing occasionally, on medium heat just until tender, about 15 minutes. There will still be a little water, but most of it will cook away. Remove from heat and drain water off. The slices should be pliable. Place in a bowl to cool completely before assembly.

stack pic small.JPG

Assembly!

Okay, you have all of your components cooked and cooled. Place one layer on your flat serving tray, spread an even layer of apple sauce (about a ¼ C), arrange apple slices in a circle around outside edge, like a clock with the core cut out facing in; inside that circle, add an inside circle. Repeat these steps 2 more times.

Place the final layer on the top uncovered with applesauce or apples. Cover with plastic wrap and put in the fridge for a few days (up to 5). Immediately before serving, warm up the caramel sauce in microwave for about 20 sec. (or wait until day of serving to make) and drizzle along the edge so that it runs down the side of the cake. Then drizzle decoratively on top. You can also use a bit of that stabilized whipped cream here too! Cut into thin vertical slices and Serve!

 Once the drizzle is on, you can’t cover it with plastic wrap, but the cake will still need to be covered as not to dry out. I use a cake plate cover to achieve this. It’ll last in the fridge for up to a week. Like a fine wine/opera singer, this cake gets better with age! The layers soak in that applesauce, and it gets more moist the longer it sits! Perfect for making a few days before Christmas!

1 Comment