CREATETV Cooking Challenge 2018!

Comment

CREATETV Cooking Challenge 2018!

Over the past few years, I’ve been increasing my knowledge of baking! In doing so, I’ve felt pretty confident in my abilities as an amateur baker. After advancing in a few casting rounds for some national TV spots, I decided that something more local may be more up my alley. We’re very lucky to have the opportunities that we do, but in some downsizing in the past couple of years, we “cut” the cable cord; I found myself falling in love with a local channel in Cincinnati, Ohio called CREATETV. From Julia Child, to Julie Taboulie, I found inspiration for baking both simple and complex cuisine from around the world. I thought, this is the right fit for my knowledge base and how I wanted to share what I’ve learned.


When the opportunity arose to “compete” in the CreateTV Cooking Challenge, I jumped on. I wasn’t successful in my first try in 2017; it’s okay, I wasn’t ready. . . In 2018, the opportunity to enter the cooking challenge came again. This time, I was able to land into the Top 18! The most amazing thing is that I get to be featured on the CREATETV website with the video that I submitted.  I can’t say that I did it all on my own; my partner, Tony, and I came up with the concept, and he helped me film the entire submission video that subsequently landed us among the top spots.


I can’t thank my friends and family enough for being taste testers, sounding boards, and most of all drive to keep me going; their healthy appetites help me to keep being creative in the kitchen as I’m not one to want to serve the same thing over and over! Check out https://createtv.com/challenge/winners for all of my fellow contestants!

Comment

Pie Crust (PÂTE BRISÉE)

1 Comment

Pie Crust (PÂTE BRISÉE)

It’s easy as pie!! Well, if you have the right crust! LOL Shortening is great, but an all butter crust is the way to go (though it can be a bit tricky). I’ve tested this recipe several times and finally figured out the right ratio of everything to make it perfect for any kind of filling! Here’s HOW:

This recipe makes TWO 9 inch crusts or ONE double crust.

Ingredients:

DRY:

2 ½ C All-Purpose Flour

2 T Brown Sugar (I use a 50/50 Dark/Light Mix)

½ t Kosher salt*

1 Cup (2 sticks) Salted Butter, cubed into ½ in. pieces and chilled*


WET:

¼- ½ C Ice Cold Water

*if using unsalted butter, I up the amount of salt to 1 teaspoon.


Other Stuff:

Food processor

Cling Film, heat safe

Large Bowl

Rolling Pin

Glass pie plate

Pie weights/Beans

Instructions:

In the bowl of a food processor, combine all of the dry ingredients and pulse a couple of times to incorporate evenly. Add cold butter and pulse several times until the mixture resembles coarse crumbs (don’t go too small at this point as you have more mixing, and it will get finer).

Remove lid and evenly distribute ¼ Cup of your water over the entire dry mixture. Pulse a few times so that the flour starts to become wet. Remove top and test by squeezing in your hand, if the dough holds but is still a little crumbly, add another tablespoon of water and check again. The pastry should feel “together” but not “sticky.” Add water until it’s holding together and not “crumbly.”

Remove from the processor and divide into two equal parts (I usually weigh). Form these divided portions into a ball and then wrap in plastic wrap; with a rolling pin, roll balls out into a disk being careful to keep the edges together. Store in the refrigerator for a minimum of 1 hour.

If you make your dough ahead by a day (it can be frozen up to a month in advance), you may need to let it sit on the counter for about 10-15 minutes before handling it. I’ve let it sit for a week in the fridge and it baked well, but you’ll have to let it “warm up” for about 15-20 minutes to be able to roll it.  

For blind baking a standard 9-inch single filling pie crust, liberally flour a surface and throw about a tablespoon into the glass pie plate, working around to pan to help the crust from sticking in the bake.  Dust a rolling pin, placing the dough in the center of your floured surface, starting in the middle roll outward; rotate the disk ¼ turn after every roll (this will help to keep the pastry from sticking to the surface). Once diameter has been achieved, roll pastry backward onto the rolling pin, dusting excess flour off, and unroll over top of your pie pan.

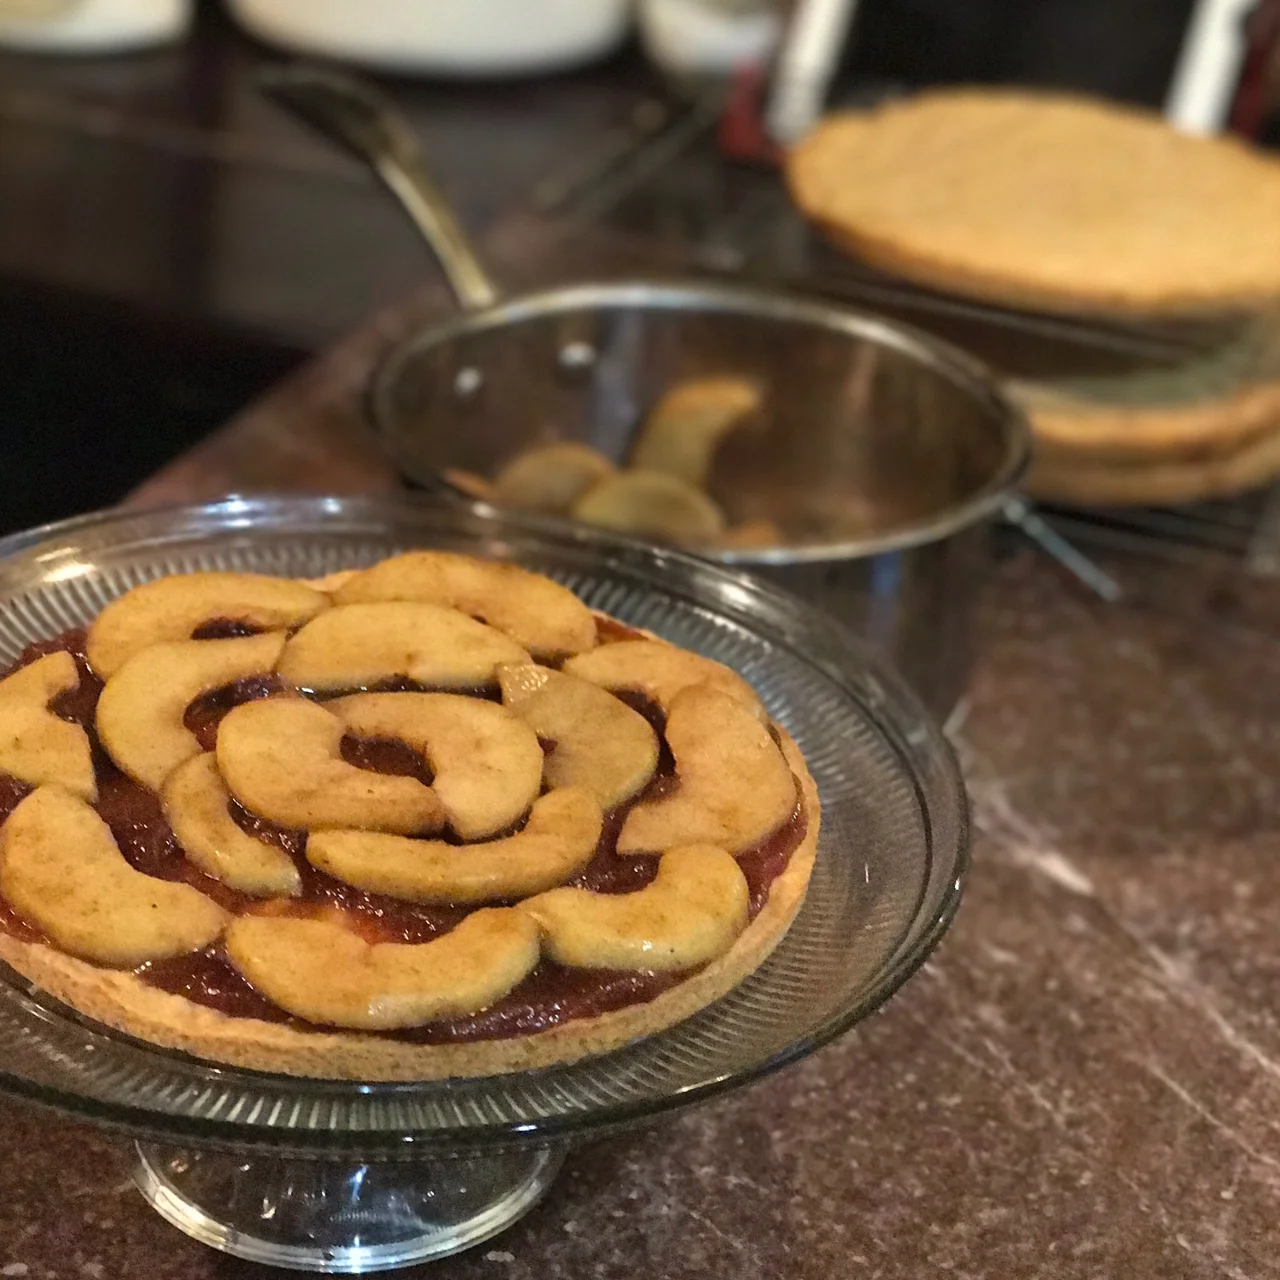
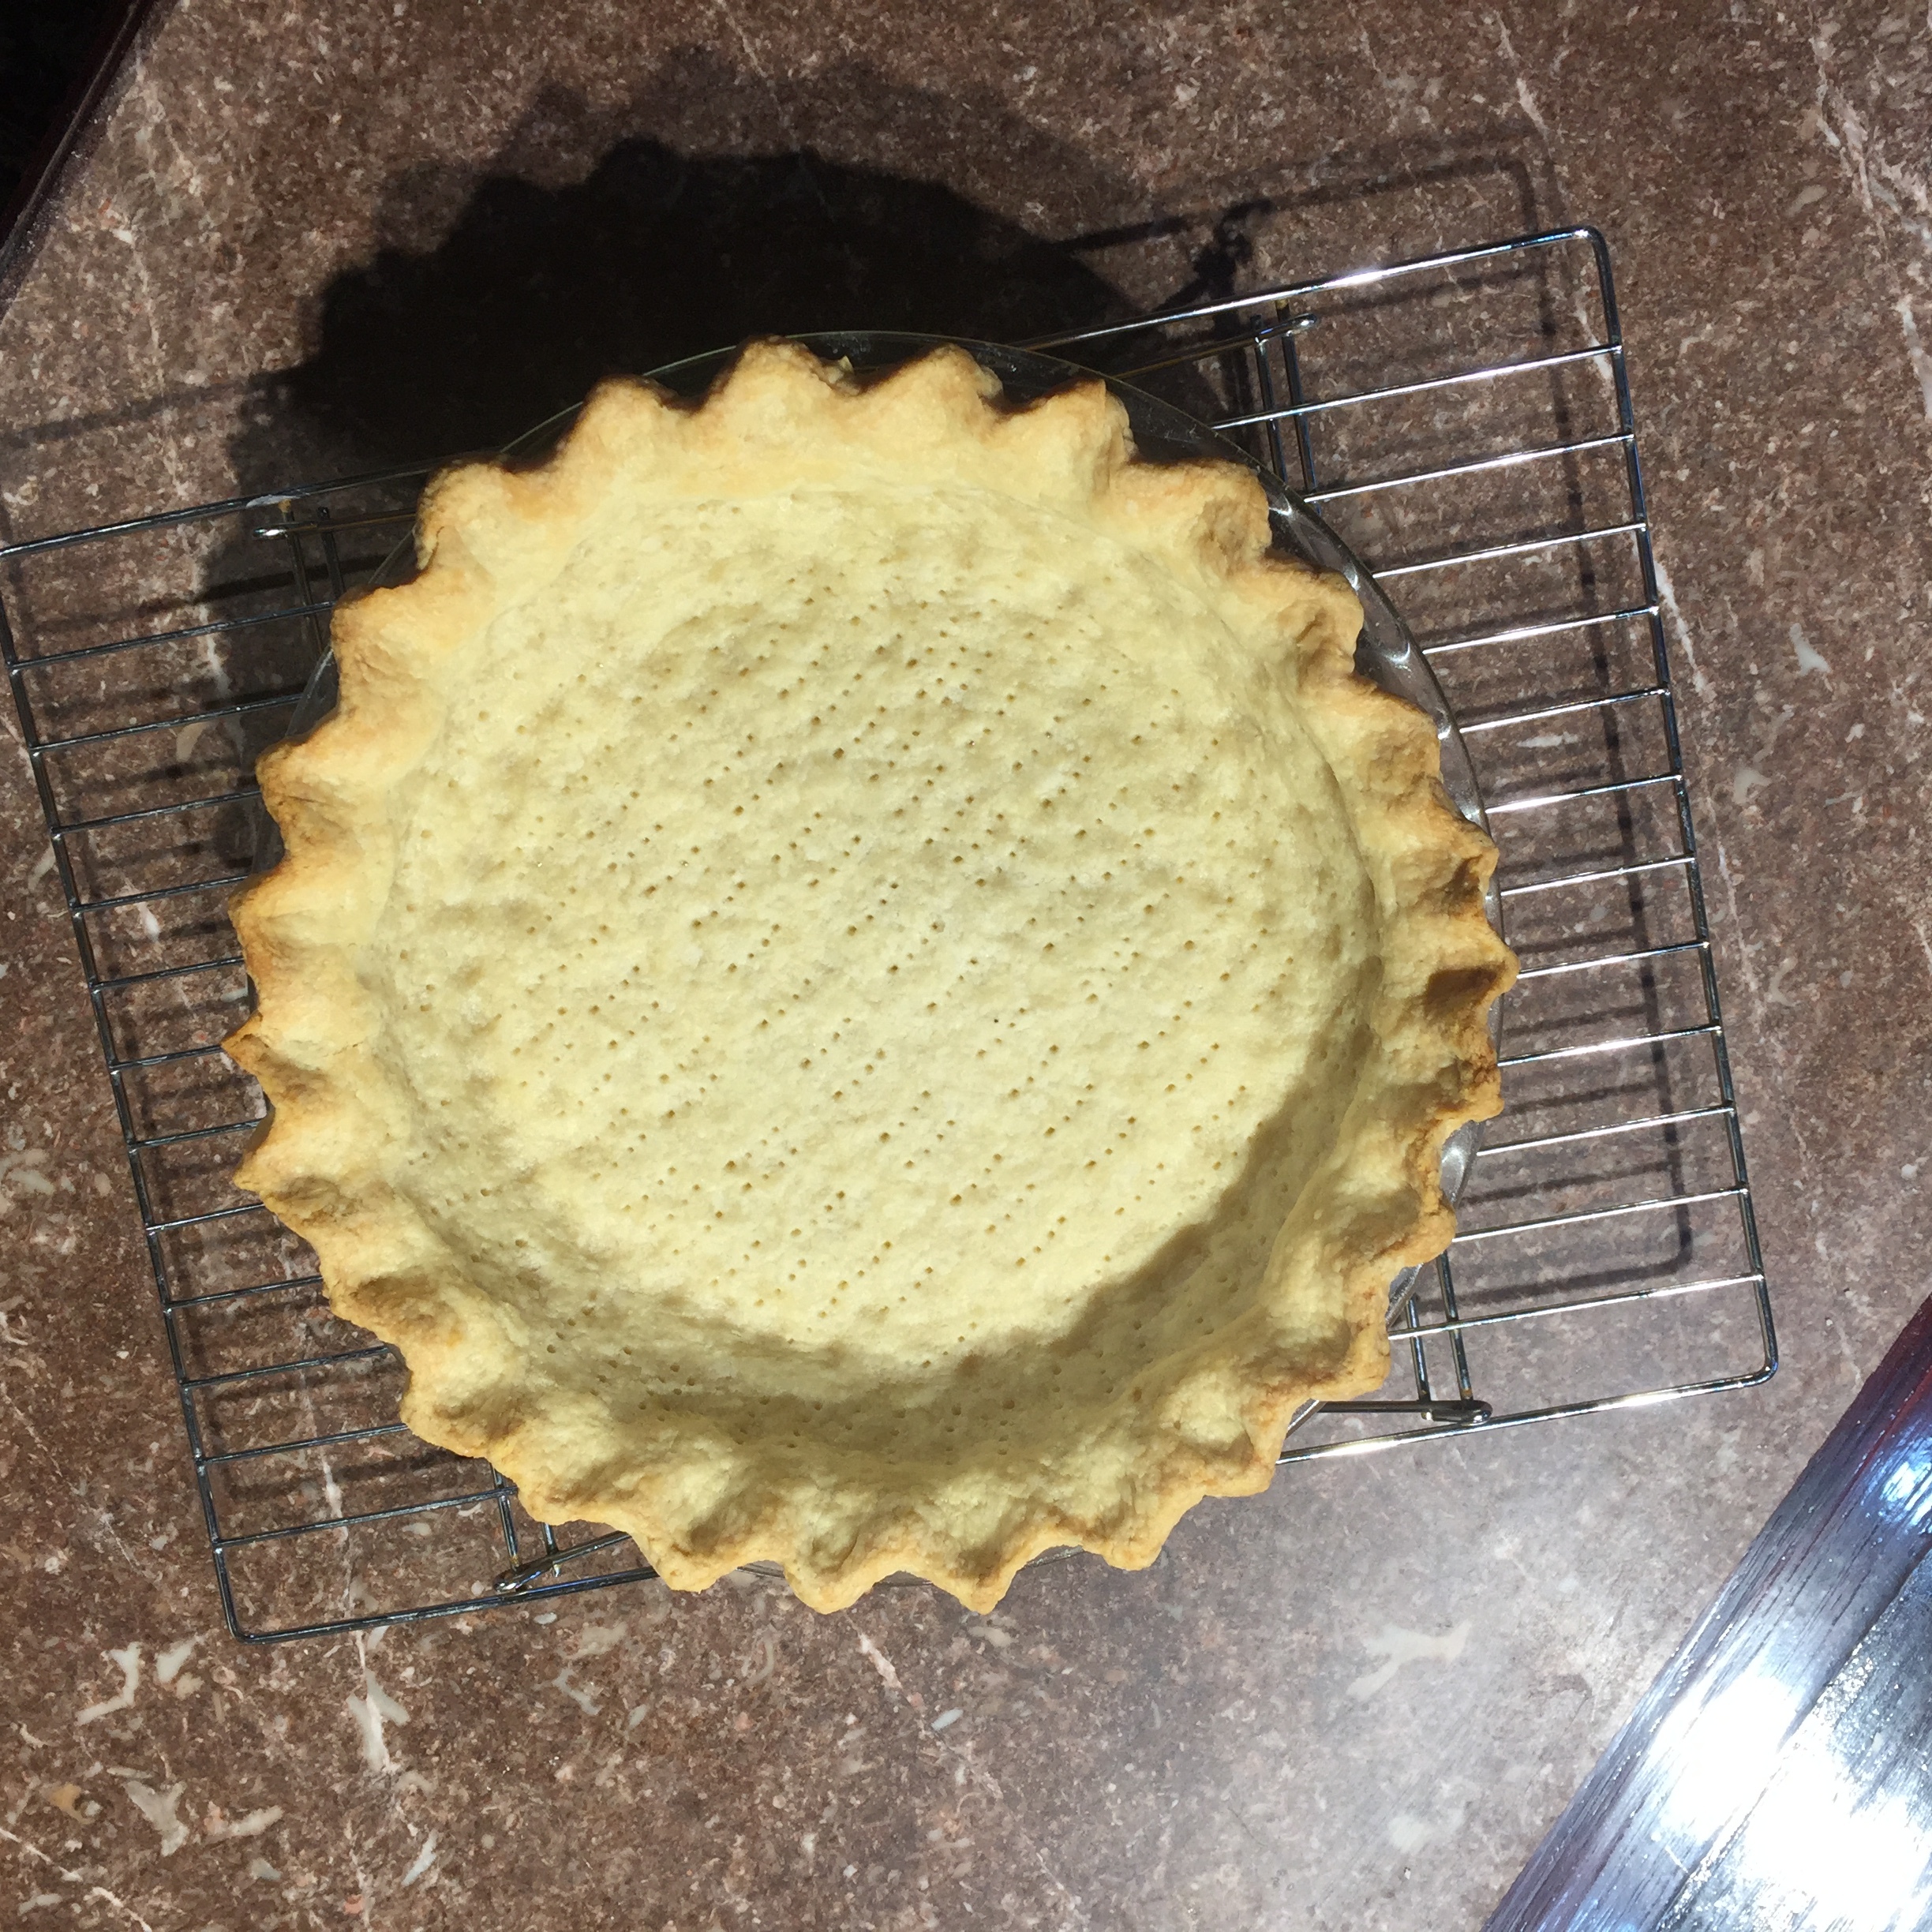
Lifting from the outside, push the sides down into the corners of the pie pan. With the overhang of the dough around the top of the pan, cut about an inch around to get rid of the shaggy edges. Being careful not to lift out of the corners, tuck under the edges to double up the pie on top of the rim of the pie plate. Now you can play around with decorations. I have stuck with a “crimped” edge where I take my thumb and forefinger on one hand and my forefinger on the other hand, and while rotating the pie plate, I press the dough with my single finger in between the thumb and forefinger. After having gone all the way around the pie plate with this, I repeat, pinching the points into a hard “v”. This severe crease will bake out. Place your decorated crust into the freezer for 15 minutes and preheat the oven to 365 DegF. (I don’t use convection here).

Line a baking sheet with parchment paper and place chilled pie plate/crust onto it. Take a fork and dock all around the edges and bottom of the pie crust. Using two layers of heat safe plastic wrap, make a “t” across the bottom of the pie plate. Pour in pie weights and wrap up plastic on top of them making a “nest” of sorts. If you don’t have the heat tolerant cling wrap, you can us a piece of parchment that you crumple up to achieve the same affect. The important thing is to allow the weights to go all the way to the edges and hold down the corners.

Bake for 25 minutes and then remove the weights. Allow to bake for another 10 minutes until the bottom of the crust looks dry.


You now have a wonderful shell to fill with whatever kind of no bake filling you desire! 

IMG_6268.JPG

1 Comment

"Special" Ingredient Fudge!

Comment

"Special" Ingredient Fudge!

Every year for the holidays, Tony and I receive a package of the most delicious chocolate fudge from my mother-in-law! I thought, “what a wonderful gift!” I didn’t really know how to make fudge, but recently, we’ve stumbled upon a recipe with a special ingredient that we’re reluctant to divulge!  We’ve of course modified and put our Will Bake 4 Food twist! Here’s How:

Ingredients:

DRY:

32 0z. Confectioner’s sugar

½ C baking cocoa

WET:

1 C butter (2 sticks)

8 oz. Velveeta cheese.

1 t Pure vanilla extract

*2 T brewed coffee

*Topping:

½ C chopped pecans or walnuts

*optional

Other stuff:

9” X 13” pan

Wax paper (or parchment paper)

Non-stick cooking spray

Large, wide-mouthed bowl

Heavy bottomed saucepot

Sharp kitchen knife/pizza cutter

Offset spatula or large spoon

Instructions:

Brew a cup of coffee (I use a single Keurig cup; instant coffee could be an option.).

Line the 9X13 in. pan with wax paper, cutting corners to allow a smooth inside. Leave enough of the paper above edges of pan to be able to grasp. Spray/oil lightly with non-stick cooking spray/vegetable oil and then gently spread around with a paper towel. Set aside.

Sift both the confectioner’s sugar and cocoa into a large bowl and whisk to evenly incorporate. Set aside.

Cube butter and cheese into small pieces and put into your heavy bottomed pot over low heat to melt, stirring constantly as to not let burn.

Pull cheese mixture from heat and add in vanilla and coffee, stir until combined thoroughly.

Pour over sugar/cocoa mixture and stir until combined; it will be pretty thick. Once no traces of sugar are left, spread mixture into the wax paper lined pan. Spread into an even layer with an offset spatula/large spoon, smoothing out the top as much as possible. Let set for c. 2 hours.

Pull out “sling” of wax paper, peel back edges and slice with a sharp knife into ¾ in. squares. Store in a container in the refrigerator for up to 2 weeks.

IMG_6214.JPG

Comment

Chocolate Citrus Almond Cookies

Comment

Chocolate Citrus Almond Cookies

We all have a friend or two with crazy dietary restrictions. I tried several recipes for those of my friends with a gluten allergy and could never find one that tasted any good. Well these cookies tasted so good that you don’t even have to say, “they’re gluten free.” We’ve put our Will Bake 4 Food twist gluten free cookies! Here’s How:

Ingredients:

DRY:

½ lb granulated sugar (about 1 C), reserving 3 tablespoons out for meringue

½ lb  Finely ground almond flour (about 2 C)

2 oz (1/2 thin bar) grated 100% cocoa bakers’ chocolate, grated

½-3/4 t ground cinnamon

1 orange (or lemon) rind, grated


WET/Meringue:

3 large egg whites, room temp

1/8 t cream of tartar

3 T sugar (reserved from the ½ lb.)

1 t pure vanilla extract

topping (optional):

almond slivers or whole almonds

Other Stuff:

Large mixing bowl

Small mixing bowl

Fine and medium graters

Kitchen scale

Hand held/stand mixer fitted with whisk

Cookie scoop/teaspoon

2 large baking sheets

Parchment paper/silicone mat


Instructions:

Separate egg whites from yolks and allow to come to room temperature. Reserve the yolks for a delicious pastry cream or fruit curd!

Preheat oven to 300DegF. Line two baking sheets with parchment paper/silicone mat and set aside.

Measure out sugar and reserve 3 Tablespoons into a separate ramekin.  Add Almond Flour Grated Chocolate, cinnamon, and finally grated orange to sugar and whisk until thoroughly combined. Set this mixture aside.

In bowl of your stand mixer, whisk the egg whites until they begin to be frothy, add in the cream of tartar and whisk until soft peaks form. Gradually add the reserved 3 T of sugar a little at a time until all is in the mixture. Whisk for about 2 ½-3 Min until hard peaks form. Add in vanilla and whisk just until incorporated.

Fold the dry mixture into the meringue about 1/3 at a time until a stiff dough is formed. With a teaspoon or small cookie scoop portion out the dough onto a cookie sheet about 2 inches apart. I like to measure these out and then go back and roll them in between the palms of my hands to form a smooth ball. Once the sheets are full, top each ball with and almond sliver. Bake for a total of 23-25 minutes, rotating the pans half way through baking.  Once baked, allow to cool for about 2-3 minutes on the sheet before removing to a cooling rack; this will allow the cookies to set. I often have 2 baking sets of these.

The combination for bitter chocolate, sugar and orange zest is one that is hard to describe, but I would say it’s Heaven J. The BEST part about these cookies is that when stored in an airtight container, they will keep for up to 7 days (they won’t last that long). 

IMG_6182.JPG

Comment

Browned Butter Snickerdoodles

Comment

Browned Butter Snickerdoodles

If you’ve ever bought a cookie during the holiday season, you’ve likely seen one called a “snickerdoodle.” Unlike how they sound, these cookies have nothing to do with “Snickers.” Traditional versions of this New England treat use cream of tartar in the recipe, BUT if you don’t happen to have that in your pantry and you need a quick snack to take to work or a party, we substitute that chemical reaction with brown sugar! One other element for a slight variation that we add to give the flavor a more balanced, “nutty” flavor is to brown the butter. Here’s how:

Ingredients:

DRY:

½ C Dark/light brown sugar

1 C granulated Sugar

3 C AP Flour

¼ t cinnamon

¼ t nutmeg

1 t baking soda

½ t salt

WET:

1 C (2 sticks) butter, browned (salted is fine)

1 t water

3 Grade A Large Eggs, room temp

1 t vanilla extract


Topping:

¼ C granulated sugar

1 T ground cinnamon

¼ t nutmeg

Other Stuff:

Heavy bottomed pot

Bowl for butter to cool

Large bowl

Wooden/silicone spoon

Cookie/Ice cream scoop

Medium bowl for cinnamon sugar

Small cup


Instructions:

First things first, we must brown the butter so that it can cool. In a heavy bottomed sauce pot, place cubed butter over medium-low heat swirling periodically until melted. Then with a spatula, keep stirring the butter until it releases a nutty aroma and becomes “frothy.” You’ll start to see it separate the whey, keep mixing it until there browned bits that come up in the froth. Once this is complete, immediately remove the butter from pot to allow to cool.

Preheat oven to 425DegF; Line 2 baking sheets with parchment paper or silicone baking mats.

In a large mixing bowl, whisk the sugars together first and then add in spices, salt, baking soda and flour, set aside.  If you’re impatient like I am, I break the 3 eggs into a bowl, whisk and temper them with the browned butter. Add the vanilla and water (this is to replace water that will have cooked out during the browning process). Add the Wet mixture into the dry mixture and mix with a spoon until it comes together. The dough will be thick.


Whisk together the granulated sugar, cinnamon and nutmeg in a bowl. With a cookie/ice cream scoop, portion out the dough onto the lined cookie sheets.  Once the cookie sheet is full and the spacing is set, take each mound of dough and roll it between the palm of your hands until a smooth ball forms. Roll this in the cinnamon sugar mixture and place back onto the baking sheet.  Once all balls are coated, take the bottom of a glass and flatten the sugar dough balls.  Bake each between 7-9 minutes. Rotating pans ½ way through. I like to make a “cookie factory” by getting one pan done on the top wrack and then ½ way through transfer ½ baked pan to bottom, inserting the next pan into the top.


Once the snickerdoodles are baked, allow them to cool for 2-3 minutes on the pan and remove to a cooling rack to cool completely.

The BEST part about these cookies is that they’ll last 7-10 days in an airtight container without going stale. SO, a bake ahead is very simple for a busy time like the holidays. 

ENJOY! 

IMG_6118.JPG

Comment